ASME SA-556M Grade C2 Seamless Cold-Drawn Tubes
ASME SA-556M Grade C2 Seamless Cold-Drawn Tubes
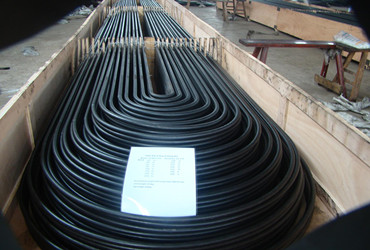
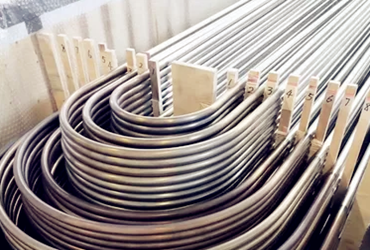
SA-556M C2 is a pearlescent carbon steel used for tubular water heater in ASME SA-556m standard, which is divided into straight tubes and tubes which are required to be bent into "U" shape.
SA-556M C2 Seamless Steel Tube is mainly used for manufacturing 300, 600MW and other high-pressure heaters. In China, the annual demand of SA-556M C2 steel tubes are about 10000 tons.
ASME SA-556M Grade C2 Seamless Cold-Drawn Tubes Quick Details
Manufacture:Seamless process
Outer diameter: 12.7mm-38.1mm
Wall thickness: 0.5mm-3.0mm
Ends: Plain End, Beveled End, Treaded
Additional Info
Port of Shipment: Tianjin, China
Payment Terms:T / T, LC
Delivery: 7-15 days after payment
Surface: Tubes will be varnished to prevent rust.
Marking: Standard + Steel Grade + Size + Heat No + Lot No
Package: Bundles (hexagonal),Wooden Boxes,Crates (steel/wooden) or as required
Technical standard requirements
Chemical composition of SA-556M Grade C2 steel tubes
| Grade | C | Si | Mn | P | S |
| SA-556M C2 | ≤0.30 | ≥0.10 | 0.29-1.06 | ≤0.035 | ≤0.035 |
Mechanical properties of SA-556M Grade C2 steel tubes
| Mechanical properties | Grade C2 |
| Tensile strength, min, ksi [MPa] | 70 [480] |
| Yield strength, min, ksi [MPa] | 40 [280] |
| Elongation in 2 in. or 50 mm, min, % (longitudinal) | 30 |
| Hardness | HR B 89 |
Manufacture
SA-556M Grade C2 Tubes shall be made by the seamless process and shall be cold drawn.
Heat Treatment:
Cold-drawn tubes shall be heat treated after the final cold-draw pass at a temperature of 1200°F [640°C] or higher to ensure ductility satisfactory for rolling into tube sheets and to meet mechanical properties as specified.
If stress-relief anneal of the U-bends is specified, the anneal shall consist of heating the bent portion within a range of 1100 to 1200°F [585 to 640°C].
ASME SA556 B2 Seamless Feedwater Heater Tubes U-tubes
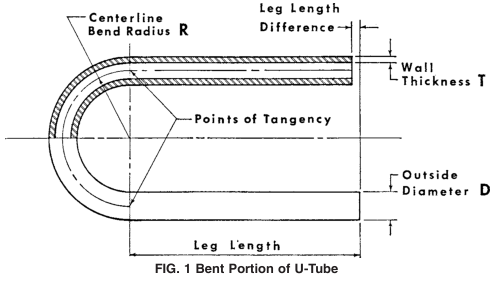
Permissible Variations in Dimensions (Fig. 1)
Permissible variations from the specified outside diameter shall not exceed 60.004 in. [0.10 mm] for tubing under1.0-in. [25.4-mm] outside diameter nor 60.006 in. [0.15 mm]for tubing 1.0 in. [25.4 mm] to 1.25 in. [31.7 mm] inclusive.These tolerances do not apply to the bent portion of the U-tubes. At the bent portion of a U-tube for R = 2 3 D or greater neither the major nor minor diameter of tube shall eviate from nominal by more than 10 %. If 1 1 ⁄ 2 D is specified, tolerances could be greater.

Permissible variations from the specified minimum wall thickness shall not exceed +20 % or −0. The wall thickness of the tube in U-bent section shall be not less than value determined by:

t f = wall thickness after bending, in. [mm],
T = specified minimum tube wall thickness, in. [mm],
R = centerline bend radius, in. [mm], and
D = nominal outside tube diameter, in. [mm].
In the case of U-tubes, the length of the tube legs as measured from the point of tangency of the bend and the tube leg to the end ofthe tube leg shall not be less than specified, but may exceed the specified values by the amount given in Table 4. The difference in lengths of the tube legs shall not be greater than1 ⁄ 8 in. [3 mm] unless otherwise specified.
TABLE 4 Tube Leg Length Tolerance
| Leg Length, ft [m] | Plus Tolerance in. [mm] |
| Up to 20 [6], incl | 1 ⁄ 8 [3.2] |
| Over 20 to 30 [6 to 9], incl | 5 ⁄ 32 [4.0] |
| Over 30 to 40 [9 to 12.2], incl | 3 ⁄ 1 6 [4.8] |
The end of any tube may depart from square by not more than the amount given in Table 5.
TABLE 5 Squareness of Ends Tolerance
| Tube OD, in. [mm] |
Tolerance, in. [mm] |
| 5 ⁄ 8[15.9] | 0.010 [0.25] |
| Over 5 ⁄ 8 to 1 1 ⁄ 4 [15.9 to 31.7], incl | 0.016 [0.4] |
The leg spacing measured between the points of tangency of the bend to the legs shall not vary from the value (2R− specified tube OD) by more than 1 ⁄ 16 in. [1.5 mm] where R is the centerline bend radius.
The bent portion of the U-tube shall be substantially uniform in curvature and not exceed 6 1 ⁄ 16 in. [61.5 mm] ofthe normal centerline radius.
Workmanship, Finish, and Appearance
Finished tubes shall be free from scale but may have a superficial oxide film on the surfaces. Alight oxide scale on the outside and inside surfaces of U-bend shall be allowed for tubes which have been heat treated.
Finished tubes shall be reasonably straight and have smooth ends free from burrs. Tubes shall have a workmanlike finish and shall be free of surface imperfections that cannot be removed within the allowable wall tolerances. Removal of surface imperfections such as handling marks, straightening marks, light mandrel and die marks, shallow pits, and scale pattern will not be required provided they are within the allowable wall tolerances.
Finished tubes shall be coated both on the outside and the inside diameter to prevent corrosion in transit. The type of coating applied should be mutually agreed upon and specified in the order.
Tests Required
Tension Test
Flattening Test
Flaring Test
Hardness Test
Hydrostatic Test
Nondestructive Test (Electric Test)
Packaging and Package Marking
The tubing will be packaged or bundled in such a manner as to prevent damage in ordinary handling and transportation and identified by a tag with the name of the manufacturer, purchase order number, specification number and grade, and size.
In the case of U-tubes, each box shall be palletized and legibly marked showing the manufacturer’s name, purchase order number, specification number and grade, size, and identification of items contained.


Please fill the following form.


![field:title/]](/uploads/221021/1-221021161Q3531.jpg)
![field:title/]](/uploads/221021/1-2210211611411C.jpg)