EN 10216-1 P195 Seamless steel tubes for pressure purposes
EN 10216-1 P195 Seamless steel tubes for pressure purposes
Standard:EN 10216-1
Seamless steel tubes for pressure purposes - Technical delivery conditions - Part 1: Non-alloy steel tubes with specified room temperature properties
EN 10216-1 Standard specifies the technical delivery conditions for two qualities TR1 and TR2 of seamless tubes of circular cross section with specified room temperature properties made of non-alloy quality steel.
EN 10216-1 P195 Seamless steel tubes for pressure purposes,Non-alloy steel tubes with specified room temperature properties
EN 10216-1 P195 Seamless steel tubes for pressure purposes Quick Details
Manufacture:Seamless process
Out Dimensions: 14mm-509mm
Wall Thickness: 2mm-50mm
Length: Fixed(6m,9m,12,24m) or normal length(5-12m)
Ends: Plain End, Beveled End, Treaded
Additional Info
Port of Shipment: Tianjin, China
Payment Terms:T / T, LC
Delivery: 7-15 days after payment
Surface: Tubes will be varnished (Outside only) to prevent rust.
Marking: Standard + Steel Grade + Size + Heat No + Lot No
Package: Bundles (hexagonal),Wooden Boxes,Crates (steel/wooden) or as required
Manufacturing process
Steels shall be fully killed.
NOTE This excludes the use of rimming, balanced or semi-killed steel.
The steel name:
(1)the capital letter P for pressure purposes;
(2)the alphanumeric TR1 for qualities without specified aluminium content, impact properties and specific inspection and testing requirements ;
(3)the alphanumeric TR2 for qualities with specified aluminium content, impact properties and specific inspection and testing requirements.
Tube manufacture and delivery conditions
The tubes shall be manufactured by a seamless process. The forming operations and delivery conditions are shown in Table 1.
Table 1 — Forming operations and delivery conditions
| Forming operation | Quality | Delivery condition |
| Hot formed | TR1 | As formed or normalized or normalizing-formed |
| TR2 | Normalized or normalizing-formed | |
| Hot formed + cold finished | TR1 and TR2 | Normalized |
Chemical composition of EN 10216-1 P235
Chemical composition (cast analysis) a in % by mass for quality TR2
| Steel grade |
Steel number |
C max. |
Si max. |
Mn max. |
P max. |
S max. |
Cr b max. |
Mo b max |
Ni b max. |
Al tot min. |
Cu b c max |
Nb b max. |
Ti b max. |
V b max. |
Cr+Cu+Mo+Ni b max. |
|
Steel name |
Steel number |
||||||||||||||
| P235TR2 | 1.0255 | 0,16 | 0,35 | 1,20 | 0,025 | 0,015 | 0,30 | 0,08 | 0,30 |
0,02 d |
0,30 | 0,010 | 0,04 | 0,02 | 0,70 |
Chemical composition (cast analysis) a in % by mass for quality TR1
| Steel grade |
Steel number |
C max. |
Si max. |
Mn max. |
P max. |
S max. |
Cr b max. |
Mo b max |
Ni b max. |
Al tot min. |
Cu b c max |
Nb b max. |
Ti b max. |
V b max. |
Cr+Cu+Mo+Ni b max. |
| P235TR1 | 1.0254 | 0,16 | 0,35 | 1,20 | 0,025 | 0,020 | 0,30 | 0,08 | 0,30 | - | 0,30 | 0,010 | 0,04 | 0,02 | 0,70 |
Mechanical properties of EN 10216-1 P235
Mechanical properties for quality TR2
| Steel grade | Tensile properties | Impact properties | ||||||||
| Steel name |
Steel number |
Upper yield strength R eH b min. for Wall Thickness T mm |
Tensile Strength R m |
Elongation A min. % b c |
Minimum average absorbed energy KV 2 J at a temperature of °C c |
|||||
| T ≤ 16 | 16 < T ≤ 40 |
40 < T ≤ 60 |
l | t | ||||||
| MPa * | MPa * | MPa * | MPa * | l | t | 0 | -10 | 0 | ||
| P235TR2 | 1.0255 | 235 | 225 | 215 | 320 to 440 | 25 | 23 | 40 | 28 d | 27 |
Note: l = longitudinal t = transverse
Mechanical properties for quality TR1
| Steel grade | Tensile properties | Impact properties | ||||||||
| Steel name |
Steel number |
Upper yield strength R eH b min. for Wall Thickness T mm |
Tensile Strength R m |
Elongation A min. % b c |
Minimum average absorbed energy KV 2 J at a temperature of °C c |
|||||
| T ≤ 16 | 16 < T ≤ 40 |
40 < T ≤ 60 |
l | t | ||||||
| MPa * | MPa * | MPa * | MPa * | l | t | 0 | -10 | 0 | ||
| P235TR1 | 1.0254 | 235 | 225 | 215 | 360 to 550 | 25 | 23 | - | - | - |
Note: l = longitudinal t = transverse
Tolerances of EN 10216-1 Seamless steel tubes
Tolerances on outside diameter and on wall thickness
|
Outside diameter D mm |
Tolerances on D | Tolerances on T for a T/D ratio | |||
| ≤ 0,025 |
> 0,025 ≤ 0,050 |
> 0,050 ≤ 0,10 |
> 0,10 | ||
| D ≤ 219,1 | ± 1% or ± 0,5 mm whichever is the greater |
± 12,5 % or ± 0,4 mm whichever is the greater |
|||
| D > 219,1 | ± 20 % | ± 15 % | ± 12,5 % | ± 10 % a | |
| a For outside diameters D ≥ 355,6 mm it is permitted to exceed the upper wall thickness locally by a further 5 % of the wall thickness T | |||||
Tolerances on exact lengths
| Length L | Tolerance on exact length |
| L ≤ 6 000 |
+ 10 0 |
| 6 000 < L ≤ 12 000 |
+15 0 |
| L > 12 000 |
+by agreement 0 |
Preferred dimensions of EN 10216-1 Seamless steel tubes
Dimensions in millimetres
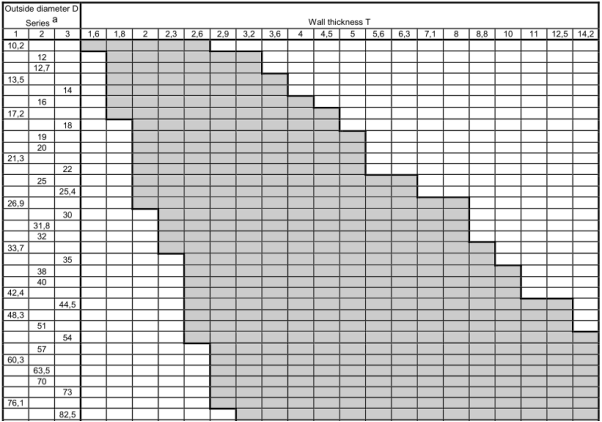
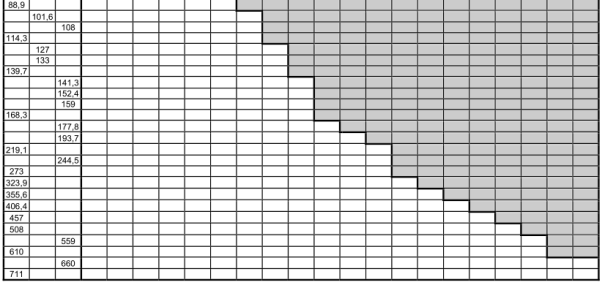
Table 7 (continued)
Dimensions in millimetres
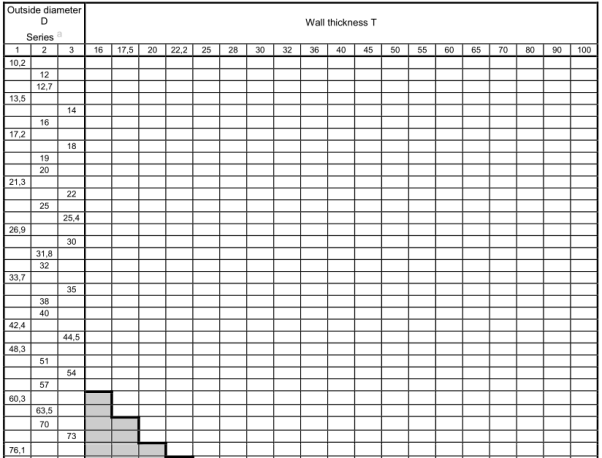
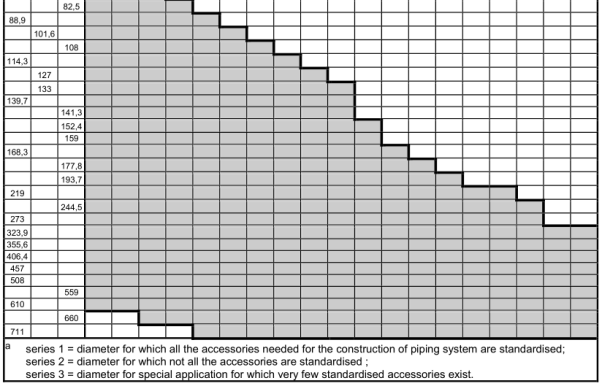
Inspection
Types of inspection
non-specific or specific inspection for quality TR1;
specific inspection for quality TR2.
Testings
(1)Chemical analysis
(2)Tensile test
(3)Impact test
(4)Leak tightness test(Hydrostatic test)
(5)Electromagnetic test
(6)Dimensional inspection
(7)Visual examination
(8)Non-Destructive Testing
Marking
The marking shall be indelibly marked on each tube at least at one end. For tubes with outside diameter D ≤ 51 mm the marking on tubes may be replaced by the marking on a label attached to the bundle or box.
Protection
The tubes will be delivered with a temporary protective coating.
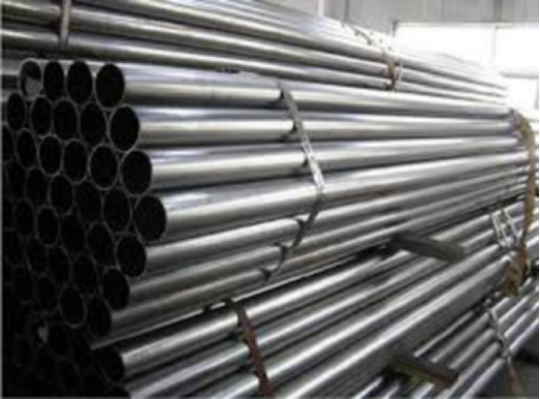
Photos of EN 10216-1 P195 Seamless steel tubes
Ordering Information
Mandatory information
(1)the quantity (mass or total length or number);
(2) the term “tube”;
(3) the dimensions (outside diameter D and wall thickness T) ;
(4)steel grade of EN 10216 .
Options
1) Delivery condition normalized or normalizing-formed for TR1;
2) restriction on copper and tin contents;
3) product analysis;
4) verification of longitudinal impact testing at −10 °C for quality TR2 ;
5) selection of method for verification of leak-tightness ;
6) Non-Destructive Testing for quality TR2 ; the test method shall be specified by the purchaser;
7) special end preparation ;
8) exact lengths ;
9) test unit restriction for tubes with D ≤ 76,1 mm of quality TR2 ;
10) wall thickness measurement away from the ends;
11) additional marking;

![field:title/]](/uploads/allimg/190926/1-1Z9261950440-L.png)
![field:title/]](/uploads/allimg/190926/1-1Z926194R30-L.png)